Hey everyone!
One thing you will probably be used to seeing on my blog are different type of boxes. I love making all different shapes as sizes as they accommodate different presents for your loved ones!
So todays tutorial is no different and I will be showing you yet another box! I love the fact that there are so many different boxes to make because I will find one which is the right size for my gifts easily!
Today I will be showing you how to make this adorable purse box.
This is by far one of my favourite boxes I've made and they are perfect for so many different presents. I actually gave one to one of my granddaughters and popped a kinder egg inside. It was the perfect size!
All you to do is follow the easy steps and pictures below to create your own cute little purse box/bag. They would also make for a nice small decoration piece your home if you added lots of embellishments.
If you want to find out how to make this then just keep reading!
What you will need:
- Card stock cut to 10 1/2" x 8"
- DSP cut to 2 3/4" x 5 3/4"
- Sticky strips
- Corner rounder
- 10" ribbon
- Closure of your choice - I went with velcro
- Mini glue dots

Steps:
1) The first thing you need to do is cut some card stock - whatever colour you would like - to 10 1/2" x 8". First score on the long side at 1", 2", 5", 6", 7" and 10". Then turn your paper 90 degrees so the 10" scoreline is at the top and score at 2", 5" and 6"
2) You then need to fold and burnish your scorelines. You need to fold you long side scoreline in a concertina pattern. See the picture below to reference.
3) You need to remove quite of the card in order to make the box. I have marked all the parts with X's to show what you need to take off. The part on the left isn't completely clear but you need to remove the bottom right triangle and the small rectangle above it. Have you card so the 2" short side scoreline is across the top.
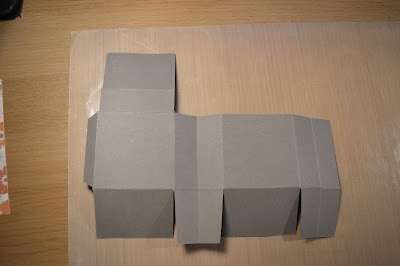
Here what it should look like so far
4) Turn your paper around and grab some scissors to do some cutting. You need to notch in on the tab on the left side and you also need to cut up the two squares on the bottom.
5) Cut off about half of the squares on the bottom
6) Round off the corners of the large flap on the top right and also cut some dsp paper to 2 3/4" x 5 3/4". Round off two of the corners on your dsp too.
7) Stick your dsp on the flap you rounded the corners on
8) Place some sticky strips on the small tab, next to dsp, then turn your box over and place some sticky strips on the rectangle below where the dsp is. Fold in half to stick the tab to the other side then seal the bottom
9) Taking a 1/8" hole punch, punch two holes in the rectangle between the flap and the box itself. You will need around 10" of ribbon to make the handle.
10) I actually used mini glue dots to stick my ribbon to the box as oppose to tying knots. I just felt this concealed it better but you could so this however you would like
11) Finally to create the closure. I decided on doing a velcro closure but there are so many different ones you could do! I just stuck the two pieces together and adhered on to the flap. Then all I did was simply close the box and stick the other piece to the onto the other part of the box!
How cute is that?!
I feel at first these seem slightly more complicating to make but once you have done it, it's a breeze.
In an upcoming post I am going to give you a tip on how you can make it easier to make all these different size and shape boxes! Stay tuned for that.
I've got some other different style boxes coming up on the blog so make sure you don't miss them. If you give any of them a go tag me so I can see!
I really hope you enjoyed tonights post and make sure to leave any requests down below in the comments section!
Don't forget if you re-make this tag me on twitter or instagram or you can use the hashtag #sukilucrafts.
Happy crafting!
Susan x


No comments:
Post a Comment