Monday, November 30, 2015

DIY Napkin Rings - #24DaysOfBlogmas Day 12

Hey everyone and welcome to the 12th post of #blogmas. First of all I can't believe we are all ready half way through and second of all, it's December tomorrow!

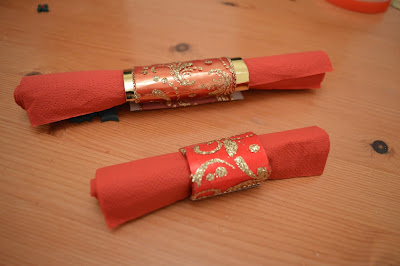
Today I wanted to give you another tutorial which you can use to decorate your table for that special family christmas dinner. I showed you how to do some placemates a few posts back and today I wanted to show you how you can create your own napkin rings.


These are so easy to make and you can create them for any size napkin you want. I wanted to give mine a simple look but you could add a lot more if you wanted to.

If you want to find out how then just keep reading.

Sunday, November 29, 2015

Hanging Snowflake Decoration - #24DaysOfBlogmas Day 11

Hey and welcome to day 11 of #blogmas!

I wanted to show you a decoration in todays tutorial which can be used in many different ways.


If you've been following all the blogmas posts you will know my theme this year for christmas is gold and red. 

I wanted to create a piece of decoration that was fun, had glitter but still looks very neat and subtle.

I created these suspended snowflakes in circles of ribbon which as you can see in the above picture I put all together and stuck them to a wall. This is just one of the many ways you could use this and I will tell you the rest at the end of this post so be sure to continue reading.

Lets get started!

Saturday, November 28, 2015

Milk Carton Box for Chocolate - #24DaysOfBlogmas Day 10

Hello everyone and welcome to day 10 of #blogmas.

I really hope you've enjoyed all the posts we've done so far, please be sure to let me know if theres anything you want to see.

In todays post I wanted to share you with how you can make a cute little milk carton box for a piece of chocolate.


I purchased a pack of chocolate snowmen and reindeers and thought it would be fun to create something that I can put them in. I gave this one to one of my granddaughters and she loves it! 

These are so easy to make and they are perfect for any little gifts you want to give Christmas day or even before.

If you want to find out how then just keep reading.
Friday, November 27, 2015

Wrapping Paper Decorating - #24DaysOfBlogmas Day 9

Hey and welcome to another #Blogmas post!

I can't believe we are already nearly half way through. 

I wanted to another quick tutorial today showing how you can create your own christmas wrapping paper.


I've always found wrapping presents quite tedious and never found a paper that I absolutely loved. Once I realised I could in a way create my own it has changed my opinion completely.

It's so easy to do and you can make your paper to match your theme. All your presents under your gorgeous decorated tree can all look they a picture from a magazine!

If you want to find out how you can make yours then just keep reading.

Thursday, November 26, 2015

Shaker Gift Tag - #24DaysOfBlogmas Day 8

Hey everyone and welcome to day 8 of #Blogmas! 

I've been having so much fun the last few days working on some more posts for the next 16 days! I can't wait for you see what else I have planned.

Today is almost a little sister to the post from day 4 the Shaker Card which you can find here. I show you how you can create your very own shaker card.


In this post I will show you how you can use the exact same method to create a shaker tag.

They are so easy to make and are very unique. I think these would be perfect to put on childrens toys as it allows for some interaction.

If you want to find out how you can easily create your own then just keep reading.

Wednesday, November 25, 2015

DIY Placemat & Coaster - #24DaysOfBlogmas Day 7

Hey everyone! I can't believe it's already day #7 of Blogmas already. I'm pretty sure doing this will make Christmas come around so much quicker for me!

How have you been enjoying it so far? It's definitely been a lot more fun, and challenging at times, to work so much more fast paced trying to make sure all the pictures are done and we don't fall behind doing this project but it's definitely been worth it so far.

In todays post I wanted to share with you a quick table decoration idea. I will be showing you more throughout the next 17 days so stay tuned!


You can very easily create placemats and coasters for you table to use during your christmas dinner. I really want all my christmas decor to match this year and I've chosen a red and golden theme. I don't want to have to hunt around for little things like placemats as I have such a specific colour theme.

If you want to find out how you can create your own then just keep reading.

Tuesday, November 24, 2015

DIY Advent Calendar Part 2 - #24DaysOfBlogmas Day 6

Hey everyone! Welcome to part 2 of how to can create your own advent calendar!

If you missed part one where I show you how to can make your boxes then check out the post here.

Today I will be showing you how to put it all together. It's pretty simple to do and I think it not only makes a pretty cool advent calendar but also looks like as a decoration piece.


I wanted to create the effect of a christmas tree which is very easily done with 25 boxes.

If you want to find out how to assemble your advent calendar then just keep reading.

Monday, November 23, 2015

Decorate Gift Tag - #24DaysOfBlogmas Day 5

Hey everyone and welcome to day 5 of #blogmas! I feel like the first four posts have just flown by.

How have you been enjoying it all so far? Let us know if there is anything you would like to see.

Today I wanted to show you another way you can create a cute gift tag. This is more decoration a ready made one than actually making it but you could definitely do one from scratch.


I think little touches here and there on my project can make the biggest different. I also think it's nice to create a special label if you have one present that is considering more main than the rest to put it on. Make's it stand out a lot more!

If you want to find out how I decorated my gift tag then just keep reading!

Sunday, November 22, 2015

Christmas Shaker Card - #24DaysOfBlogmas Day #4

Hey! Welcome to yet another #Blogmas post. I have been loving doing there the last few days and can't wait to continue up until post #24.

Let me know how you've been enjoying them lately!

In todays post I want to show you how to make a Christmas shaker card. I showed a shaker card a few posts back and I will be using the same method to make this one. Stay tuned though because I will show you the other method.


I think shaker cards are perfect for christmas as you can use the shaker part to create a snow scene. Again this card is perfect for pretty much all ages and it will make a wonderful piece to someones card collection! 

If you want to find out how to make to this card then just keep reading!

Saturday, November 21, 2015

DIY Advent Calendar Part 1 - #24DaysOfBlogmas Day 3

Hey everyone! Welcome to another day of #Blogmas here on Sukilu Crafts.

Today on day #3 will be part 1 of how to make your own advent calendar. I will also be showing you how to put it together so be sure to stay tuned for that! 


I experimented last year making my ow advent calendar but it didn't turn out exactly how I planned. I love how it turned out this year though and I think my granddaughters are going to love them! 

This is a perfect idea for someone who doesn't like chocolate or if just want to fill it with something other than food. I know that things like Shopkins are extremely popular with children at the moment.

They are pretty easy to make but as you need to create 25 then it does take up quite a few supplies. It's well worth it thought in my opinion.

If you want to find out how to make your own the just keep reading.

Friday, November 20, 2015

Handmade Gift Tags - #24DaysOfBlogmas Day 2

Hey everyone and welcome to day 2 of Blogmas!!

I hope you enjoyed the first post last night where I showed you how you can make your own christmas crackers! If you haven't seen that post yet check it out here.

Today I wanted to show you something very simple yet fun in my opinion.


Handmade gift tags! I wanted to make something slightly different to your typical christmas gift tag. You can add as much decoration - like pictures or sentiments - as you would like and still have more than enough room to write your message.

You can make these whatever shape, size, colour you would like and they take no time at all!

If you want to find out how to make your own gift tags then just keep reading.

Thursday, November 19, 2015

DIY Christmas Cracker - #24DaysOfBlogmas Day 1

Hey everyone! Welcome to an exciting time here on Sukilu Crafts.

Me and Danielle really wanted to do something special for christmas and we come up with the idea to do Blogmas (a take on Vlogmas). In the next 24 days you will get a post from us every single day. They will all be christmas related! There may even be a special giveaway at the end.

To kick of Blogmas I will show you how you can make your own christmas cracker! The beauty of making your own christmas crackers is that you can fill it with whatever goodie you like. Also a lot of christmas crackers make a loud noise when you pull them - not these ones!


You can also customise the colours of your crackers to match your decor! They are pretty easy to make but one tool you need to make it work better is a paper cutter with a perforated blade. This will just create small slits in your card stock to allow it to rip smoothly. You can achieve this in another way which I will explain to you later in the post.

If you want to find out how to make your own christmas cracker then just keep reading.

Sunday, November 15, 2015

DIY Paperclips 2 Techniques!

Hey everyone!

I wanted to do a quick post today about how you can decorate your paper clips. I was totally inspired by some Heidi Swapp paperclips Danielle had!

They are so easy so make and you can decorate them to coordinate with your planner pages, journalling pages or whatever you would like. It's also another fun way to use up some of your scraps.


In this post I will show you how to decorate with ribbon and die cuts! I used some large paperclips I purchased from Tiger, they were super inexpensive.

If you want to find out how to decorate yours then just keep reading.

Wednesday, November 11, 2015

How To Create A Cloud Scene + Some Fun News!

Hey everyone! Welcome to another post on our blog!

Today I wanted to share with you another technique which is fun and I think you will really enjoy it.

I have done a few techniques on my blog before. I love how you can use your crafting supplies for more than they are intended for and there are so many possibilities with what you can do.


The technique I will show you today is how you can achieve a cloudy-like sky. I think it looks pretty realistic and you can use it for many things. Creating a scene on a card, some decoration for journalling or some DIY artwork for around your house.

You will only need a few things for you so just keep reading!

Sunday, November 8, 2015

Birthday Shaker Card - Step By Step Tutorial

Hi everyone! Hope you have had a lovely weekend.

I feel like I haven't done many card tutorials lately so I thought it would show you how you can make a shaker card. I love these cards as I think they are so fun and perfect for a wide range of people and occasions.


I've seen people make shaker cards using a few different methods so in this post I would show you one of them. If you would like another post making one using a different method then please let me know.

If you want to find out how you can make one of your own then just keep reading.

Saturday, November 7, 2015

DIY Midori Pocket Insert - Fridays With Danielle

Hi everybody!

I'm so sorry for this post being a day late but I didn't have the camera with me unfortunately!

I wanted to do a quick and simple post for you today showing how you can make a Midori Pocket Insert for your Fauxdori's, Foxydori's or even one you have made yourself.

If you read my post you will know I love the whole travellers notebook world and making my own inserts and accessories is something I really enjoy doing.


I showed a picture of one I made in my DIY paperdori post, you can find it here. I wanted to show you exactly how I made it in tonights post.

If you want to find out how to make one of your own then click the button below.

Wednesday, November 4, 2015

Pattern 3D Butterfly Picture - DIY Decor

Hey everyone!

Welcome to another post.

I wanted to do another quick one tonight to show you a cool way you can DIY some decor for your home. I purchased this deep frame from my local charity shop and I wanted to find a fun way to use it.

I decided to create this pattern of 3D butterflies on a sky background and I loved how it turned out. I really wanted to share it on here incase it gave someone else inspiration to create some wall art of their own.


It's so easy to do so just keep reading to find out!

Sunday, November 1, 2015

DIY Lantern - Step by Step Tutorial

Hey everyone!

Welcome to another step by step tutorial.

In todays post I wanted to show you an amazing way you can create a safe decorative lantern. I have done another post previously showing you a milk carton lantern - see post here. 


I decided to make a bigger slightly different version which again like the previous is safe. There are a lot of steps to this tutorial but once you get the hang of it, its super easy!

Apart from decor this would also look so sweet in a child's room! You could make them as tall or as short as you would like. 

Now let's get on with the tutorial, keep reading to find out more!