Sunday, June 28, 2015

Captain America Card - 4th July Inspired Step By Step Tutorial

Hi everyone! I'm super excited about this Sundays step by step tutorial!

Next weekend, on the 4th July, a huge number of people in the United States will be celebrating Independence day. I felt really inspired to create a card with a red, white and blue theme as not only do I have a large amount of readers from America visit my blog on a daily basis but it is my eldest daughters birthday on the 4th July!

This is the card I will be showing you how to make.


I thought it would be perfect to do a Captain America card as it incorporates all the colours I wanted to use, it involved a Superhero who is based in America and it's a card suited for all different ages and occasions!

I actually made a card very similar to this for a someone's 18th birthday as he is a huge marvel fan. I also made a few other marvel themed pieces which you can see in the picture below.


I absolutely love how the card turned out and I think it would be perfect for so many different occasions during the 4th July week. You could replace the Captain America shield with fireworks or anything else you think you would suit the person/occasion. I think it would even be perfect for a 'Happy 4th July' card!

I really hope you enjoy this tutorial and if you are not from America you could definitely use a similar method to use the colours from your countries flag.

If you want to find out how to make this then keep reading

Wednesday, June 24, 2015

How To Make Your Own Embossing Paste - #SukiluDIY

Hi everyone!

In todays post I wanted to show you another DIY project I think you will like. Now that I have been crafting for sometime and tried so many different techniques and effects I want to start branching out and adding other new things.

I have done anther DIY previously which I still love to use in my projects so I wanted to show you another one. My other DIY was how you can make your own spritzing inks which you can find here.

You can buy embossing paste and use stencils to create a patterned surface onto your projects! I think it looks amazing and I've seen some people use it in art journalling or making cards and watercoloring on top.

I wasn't sure exactly how I was going to like it so I didn't want to go out and buy the paste as I felt it was fairly expensive. I thought it would be so fun to make my own and experiment with that to see how I got on!

I'm so glad I did and I love how it turned out. Check out how it turned out. I made a rose gold paste and used a honeycomb stencil.


It's so easy to make and the best thing about it was I already had all the items and equipment I needed I didn't even have to go out and buy anything!

I also wanted to make a coloured one as oppose to the white paste I see which seems to be used most to show you can custom colour it to your needs.

If you want to find out how you can make embossing paste then keep reading!

Sunday, June 21, 2015

Gift Bag with Burlap Ribbon - Step by Step Tutorial

Hi everyone! Happy fathers day and hope you have or are having a lovely day! If you missed my fathers day post last week you can check it out here.

In todays tutorial I wanted to show you how to make this gorgeous bag. I actually saw this on Deb Valder's youtube channel and immediately wanted to recreate it.
You can check out her youtube channel here. She makes some beautiful things so definitely take a look!


I love the soft curves around the bag and the burlap ribbon. You could make this bag for either male or female and a wide range of occasions. You would just need to change up the designer paper and embellishments. 

It's the perfect size to fit so many different gifts from chocolates to aftershave or you could even fill it up with loads of small goodies for a little ones birthday. 

It's so quick and easy to make so if you have a busy month with birthdays or other occasions you could always make some of these to give out all of your gifts whilst still adding that personal touch!

If you want to find out how to make this bag then keep reading!


Wednesday, June 17, 2015

How To Build Your Hobby

Hi crafters! Just over halfway through the week until the weekend!

I will keep the introduction relatively short as this is a very fairly long post. Today I wanted to share a few tips and tricks on how you can build your crafting hobby. These are all things I have learnt along the way or have picked up from other crafters.

Having a hobby can be very expensive but there are a few ways you can help to grow your essentials without having to spend a huge amount of money. I wrote down all my tips on a piece of paper and split them into three categories; essentials I couldn't live without, where I save my money and extra tips.

Obviously these are things that I have found to work for me and building on my hobby but there may be some areas where you disagree. I only suggest you bear them in mind and if they work for you, brilliant!

This isn't 100% of saving money but also about how you can begin to delve into crafting. Walking into a shop or even walking down an aisle full of crafting bits and bobs can be extremely overwhelming so hopefully you can take something from this post to help.

If you have any tips and tricks of your own then please comment down below so everyone can see them.

Now grab a snack or a cup of coffee and continue reading to find out how you can build your hobby!


Sunday, June 14, 2015

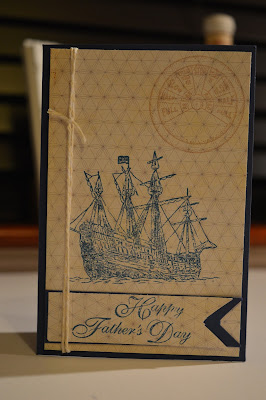
Fathers Day Post

Hi everyone!! Welcome back to my blog.

In todays post I wanted to show you how you can make a bag and a card for fathers day. I did something similar to this for mothers day which you can see here.

In that post I made a card and gift box that matched - I used the same colour card stock and designer paper. However, in todays tutorial I wanted to show you how you can still have a 'matching' gift bag and card without having to use the same thing for everything. I will explain during the steps as to why I decided not to use the same designer paper for the card.

The bag I will be show you how to make tonight is the perfect size for some aftershave, chocolates or any other small gift you have for you dad or grandad. I love the vintage looking tag on the bag. I also show you how to make a very simple card. I went for a nautical theme and I love how it turned out! 


I think these look great together as you got the brown and cream tones on both of them and the pop of blue on the card which is very subtle!

I used a few products I recently purchased from Stamp Addicts - you can find their website here. If you are in the uk and in the Bedfordshire/Hertfordshire/Buckinghamshire area you should definitely visit their shop!

If you want to find out how to make these then keep reading and lets get crafting!


Wednesday, June 10, 2015

Make Your Own Faux Tiles!

Hi everyone! And happy Wednesday!!

In todays post I wanted to show you how you can make faux tiles! I'm so in love with these and there are so many different types you could make and so many different uses for them!

I think they actually look like your tiles you'll find in your kitchen or bathroom.

I wanted to use a stamp on mine which I could colour in using a range of different colours and look 'realistic.' By realistic I mean the same colour it may be in real life as oppose to it actually looking real. I decided to use a stamp from a set I get free in a magazine as it had these beautiful flowers. I used the same set in last Sundays post which you can find here.

There are so many different uses for these, you could make a card with them, make a picture, use them on a gift bag! Keep reading until they end and I will show you how you can do one of these. You could also experiment with different pictures. Prehaps use a variety of stamps to create a scene or do something simple like a big heart and colour it in different colours.

I do have to say I'm still a beginner when it comes to watercolouring and I find this pretty easy to do so don't be scared of it! If you chose something simple to colour it will definitely make it a lot easier for you to do! I've included a few tips along the way to help you out.


Hope you enjoy this post and keep reading to find out how you can make these faux tiles!


Sunday, June 7, 2015

Thank You Card - Step By Step Tutorial

Hi everyone! Hope you've had a fantastic weekend.

Welcome to another step by step tutorial. I absolutely love doing these posts as I get to play around with new and interesting ideas.

In todays tutorial I have this very simple yet beautiful thank you card! I love the halo of flowers encircling the sentiment and the bird stamp that I used.


You could use this technique for so many different shapes as well. You could have a heart with a halo of smaller hearts around it, a star or even a square. I love how the card looks complete yet you hardly have to do anything to it!

I frequently get different crafting magazines and one I got recently gave you free stamps with it. The stamps I got actually inspired the card. How beautiful do they look?!


I got these with the Cardmaking & Papercraft magazine. You can visit their website here. You should definitely follow them on twitter to get updates and all things crafs, you can find their twitter here.

I've actually used these stamps for so many projects and I will actually be showing you some of them in the next few weeks on my blog. 

I think it's amazing how you can get such amazing gifts with magazines. You can use these for a variety of occasions as well and they are so different from what I own already!

If you want to find out how to make this card then keep reading!

Wednesday, June 3, 2015

How To Make Your Plain Flat Flowers Look Metallic!

Hi everyone!

A few weeks ago I did a post about how to make your own spritzing inks - see post here. I have found so many use for these so today I thought I would show one way that I love.

I found some paper flowers in one of my local crafting suppliers and never really found a use for them as I felt there were some what plain. I decided to use my homemade spritzing inks to make them look metallic and adapt them to look exactly how I wanted.

When I wrote the post about how to make the spritzing inks I mentioned about the smell you get from using surgical spirit. I found the smell had deteriated a significant amount when I used it to make these flowers!

I think these look absolutely beautiful and you can use them for so many things! I actually made some for a bag I did which will be coming in a post in a few weeks. Heres a sneak peak.


You can experiment so much with different colours and also different shapes. You don't have to just to flowers, you can make some lovely red metallic hearts! They are so easy to make and you don't need much to make them.


I love how they have this beautiful sheen to them as oppose to looking glittery. The camera flash picked this up amazingly.

Lets get started!!