Hey everyone!
Welcome to another step by step tutorial.
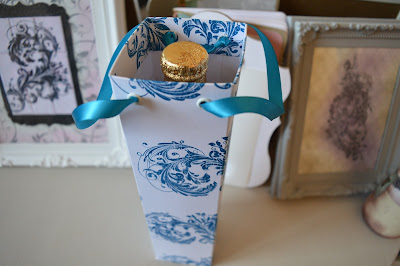
I wanted to create a nice bag for a beer bottle as I was giving to someone at my work for his birthday! I couldn't find anything that fit nicely that I had already made and nothing online!
I actually worked out all these measurements myself and I love how snug the bottle fits. It was quite easy to make once I had worked out the measurements. This should fit most standard shape/size beers. It may just need adjusting slightly for bigger ones.
If you want me to do a post about how I work out the measurements for this and other gifts then let me know in the comments section!
Just keep reading to find out how to make this bag.
Steps:
1) First of all you will need to cut a piece of card to 13 1/2" x 10 1/2". If you can get patterned paper big/thick enough then I would use that. If not, use a piece of plain card and stamp a pattern on it as I did
2) Score on the long side at 1" and 11 1/2". Then score on the short side at 2 1/2", 5", 7 1/2" and 10"
3) Cut into all the scorelines you made on the short end up to the 11 1/2" scoreline to create flaps. You also need to remove the two rectangles at the top and bottom of the 1/2" flap. Notch in slightly at the top and bottom
4) Place some double sided adhesive on the back of your card on the 1" flap but do not go all the way to the edge of the side where you haven't removed anything
5) Fold the flap down
6) Place some double sided tape on the 1/2" flap and fold in half to secure. You should be able to tuck this into the top of your box where you didn't place the double sided tape. This will help to create a more seamless look
7) Use more double sided tape to put together the bottom of your box or any adhesive of your choice. Just be sure that the last flap you adhere to the bottom goes towards the back of your box where the seam is
8) To reinforce the bottom of your box and make it stronger, cut a piece of thick card 2 7/16" and place it in the bottom of your box
9) Finally punch some holes at the top of your box and add some ribbon to act as your handle!
I really hope you enjoyed this tutorial. You could even use this for some faux flowers for something and it would make for a cute handmade 'vase!'
Let us know what else you'd like to see on the blog.
Happy crafting!
Susan x


awesome, simply superb. i loved it. thank you. SharePoint jobs in Hyderabad
ReplyDeleteNice post keep sharing like this, thank you. CCNA jobs in hyderabad location.
ReplyDeleteI would love to see a youtube video on how to create this box please :)
ReplyDelete