Hey everyone and welcome back to another easter post!
I wanted to share with you another idea for a DIY easter basket. They remind me of picnic baskets so they would be perfect for an outdoors easter hunt.
You could very easily adjust the size to make it slightly bigger if you wanted. If you have an trouble with that and would like a certain size then please leave a comment down below and I'd be happy to help anyway I can!
I wanted to keep the decoration minimal on this one as I felt the design of it alone was very nice but you could always add your own embellishment. All you need is some card stock, DSP and adhesive and you have everything you need.
If you want to find out how you can make your own then just keep reading.
Steps:
1) You will need two piece of card stock, both the same colour, one 6" x 6" and other 6" x 3/4". You will also need seven piece of DSP. Six of these will be 1 7/8" squares and the other will be 6" x 5/8"
2) Score you 6" x 6" card stock all round at 2". Alternatively you would score at 2" and 4", turn 90 degrees and repeat!
3) Round all four of your scorelines then cut into the scorelines on one side up the next scoreline and repeat on the opposite side. So the other two opposite sides will have no cuts in them
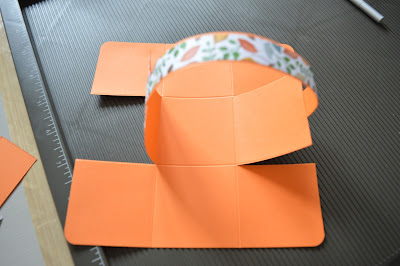
4) Place all the DSP sqaures on the card, if you have a pattern that has to go a certain way make sure all the ones at the bottom are upside down so when you put the basket together they will be the right way up. The DSP will go on the sides you have cut so the centre one is essentially a flap
5) Round one corner on the corner squares so it matches where you did so on the card stock then adhere your DSP permanently
6) With your two strips (one card stock and one DSP) stick the DSP onto the card. The short sides will match perfectly and you should have a small border on the longer sides. This will act as your handle
7) Turn your handle upside down and put a small amount of sticky strip on each small end then take a bone folder and gently pull your handle through curving it slightly. This will break up the fibres a bit and give it a nice rounded shape. Be sure to have the non patterned side against the bone folder
8) Adhere one side of your handle in the middle of the centre flap and repeat on the opposite side
9) Then to finish simply place some sticky strip on the inside of squares with DSP (the back) and fold onto the centre square, you should have a triangle under where they meet. Repeat on the other side. See the last picture down below for reference!
I really hope you enjoyed this tutorial! As you can see they are super easy to make. As soon as you have made one you won't even need to look at instructions for it.
Be sure to comment down below if you have any troubles and if you re-make any of our easter baskets then take a picture and tag us on Instagram so we can see!
Happy crafting! & Easter
Susan x


No comments:
Post a Comment