Hey everyone!
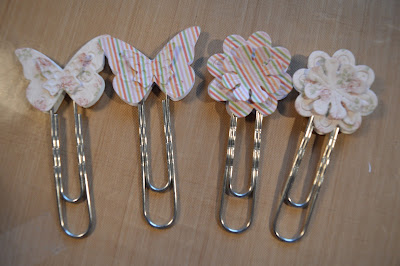
I wanted to do a quick post today about how you can decorate your paper clips. I was totally inspired by some Heidi Swapp paperclips Danielle had!
They are so easy so make and you can decorate them to coordinate with your planner pages, journalling pages or whatever you would like. It's also another fun way to use up some of your scraps.
In this post I will show you how to decorate with ribbon and die cuts! I used some large paperclips I purchased from Tiger, they were super inexpensive.
If you want to find out how to decorate yours then just keep reading.
Steps:
Diecut Pieces Version
1) The first thing you will need to do is die cut shapes. I chose to do butterflies and flowers. You will need two of each (so you can have one for either side of your paperclips). I went with die sets I had that meant I could get a smaller version of my shape. I wanted to add some dimension to my paperclips. Once you have cut them all out you will wanted to stick your smaller shape onto the centre of the bigger. I folded my butterflies and bowed out my flowers.
You can really play around with shape and design on this. It all depends on the kind of look you are going for.
2) To build your paperclip is very simply. You will need to put some liquid glue - like tombow - onto your paperclip. Be sure you don't put it on the end you slide onto the paper. Then glue this to the underside of your shape. Leave to the side to dry.
3) Once the glue has dried take a small piece of foam dimensional under the paperclip. Then take the other piece you cut out to match and stick this onto the foam dimensional lining up with the other side.
Repeat all the steps for the rest of your paperclips
4) This is optional but you could also add some gems or glitter to your paperclips. I add pearls to my flowers and tiny gems to my butterflies.
Ribbon Version
1) To add ribbon to your paperclips you will need to have a length of ribbon thats around twice the size of how long you want it to be on the paperclip. You can trim if it's too long. You can use more than colour if you would like as I have done or just the one.
2) Lay the ribbon on the paperclips and hold with your thumb, take the end on the left and thread through the back towards you. Repeat the same on the other side. Be sure to always hold the middle part. To secure simply pull on the two ends tightly. You can use some liquid glue to add a bit more security.
3) Repeat the same with your second colour
As you can see it's pretty simple. You could even try the ribbon technique with some fabric.
I really want to try and make some with badges!
If you have any questions about this tutorial please let me know in the comments below.
Don't forget on the 19th November 8.30PM UK time #24DaysOfBlogmas will begin. You will get one post a day from us for 24 whole days! We are so excited to share with you the fun things we have some up with and really hope you enjoy it! Let us know if there is something in particular you want to see from us.
Don't forget if you re-make this tag me on twitter or instagram or you can use the hashtag #sukilucrafts.
Happy crafting!
Susan x


No comments:
Post a Comment