Saturday, December 12, 2015

Blogmas Giveaway - Coming Soon! #24DaysOfBlogmas Day 24

Hey everyone!

I just wanted to do a quick post to explain a giveaway we will be having in a few short days! This post is going up later than normal as we have been busy discussing details.

For the last 24 days we have been doing a post a day for something we called blogmas! We really wanted to do something fun where we can could give you a ton of ideas for christmas but also with enough time.

We have enjoyed doing it so much and as a thank you to those of you who follow the blog and also our social media account we wanted to do our very first giveaway! It's also our way of giving you a little christmas present!

Currently we are still getting everything together for the giveaway as we want to make it as perfect as possible for you and show our appreciation. It will be all crafty things both made by us and also bits we have purchased ourselves!

Stay tuned and be sure to follow us on Instagram as that's where we will be hosting the giveaway later this week!

Let us know in the comments below what's been your favourite #blogmas post!

Our social media accounts -----> TwitterInstagramTumblrFacebook and Pinterest.

Happy crafting! & Blogmas; sad to see it's over!! We have a lot planned for 2016 though so be excited!

Susan x

Friday, December 11, 2015

Aurora Borealis Card Part 2 - #24DaysOfBlogmas Day 23

Hey everyone and welcome to the last tutorial post of #blogmas! 

I can't believe we started this nearly a month ago. It's gone by so quick and it's been such an enjoyable experience. I really hope you have all enjoyed it!

If you saw last posts - here - you will have seen me show you how you can create an aurora borealis scene with inks! Now in this post I will show you how you can put it together in a card/


I created a very simple card to show how effective the aurora borealis sky is! You will easily be able to re-create this card with limited supplies.

If you want to find out how to make this card then just keep reading.

Thursday, December 10, 2015

Aurora Borealis Card Part 1 - #24DaysOfBlogmas Day 22

Hey everyone. We are down to the last few #blogmas posts!

I wanted to do a two part card tutorial for the next couple of posts. This first part I will show you how to easily create an aurora borealis scene! You only need a few colour inks and a couple of sponges to get the amazing look!


You could use this technique to create cards for any occasion but I think it's particularly fun to use for a Christmas card!

If you want to find out how to make this card then just keep reading.

Wednesday, December 9, 2015

DIY Decorative Reef - #24DaysOfBlogmas Day 21

Hey everyone and welcome to post 21 of #blogmas!

I wanted to do a real short one today showing you how you can quickly make your own reef!


I saw a circle of woven wood in a market for such a small price and was completely inspired to make my own reef.

It's so easy to do and you only need a few materials to make it.

If you want to find out how to make your own then just keep reading.

Tuesday, December 8, 2015

2 in 1 Christmas Card & Gift Card Holder - #24DaysOfBlogmas Day 20

Hey everyone! I can't believe we are already down to last 5 post for #blogmas! It's gone so quick!

I wanted to do another christmas card for you today but with an added extra; a gift card holder!


This card is perfect for so many reason, if you are in a rush, have limited supplies or wanted to completely surprise someone! It's so easy to make and your play around with the position of your gift card! You don't have to worry about it falling out when they open it and it hides what kind of gift card it is. I don't usually like to give gift cards with the shop name on the card as it gives it away instantly!

If you want to find out how to make this super easy card then just keep reading.

Monday, December 7, 2015

Box For Truffles! - #24DaysOfBlogmas Day 19

Hey everyone! Hopefully you will have seen my homemade truffle post - if you missed it you can find here

I said I would be showing you how to make a box for the truffles the next day but I got the posts mixed up and to be honest I couldn't wait to show the biscuits!


I made a small sliding box that will fit two truffles - just the right amount - and I also added a window as I did with the box for the biscuits!

This box is super easy to make and hopefully it will give you another fun idea on how you can box up your presents for your loved ones.

If you want to find out how to make the box then just keep reading.

Sunday, December 6, 2015

Box For Christmas Biscuits - #24DaysOfBlogmas Day 18

Hey! Can you believe we are coming near to the end of #blogmas?!

If you missed yesterdays post I showed you how to make some delicious biscuits. Check it out here. I wanted to show you how you can make a sweet little box for your biscuits.


You and your children or grandchildren can give these out as presents. They are so easy to make and you can add some many embellishments or leave it nice and simple.

If you want to find out how you can make your own then just keep reading.

Saturday, December 5, 2015

Christmas Biscuits - #24DaysOfBlogmas Day 17

Hey everyone and welcome to another baking post here on Sukilu Crafts!

Yesterday I did a post on how you can make some yummy truffles - which me and my family thoroughly enjoyed. I mentioned today's post would be a box to put the truffles in but as it's the weekend I couldn't wait to show you something else! Me and Danielle made these biscuit with Danielle's daughter Brooke. It was such a fun afternoon and Brooke really enjoyed making, and eating, these biscuits.


If you haven't got any plans for the weekend I would highly recommend you grab your children or grandchildren or even nieces/nephews and have some fun in the kitchen. This biscuits are a vanilla flavour decorated with some simple icing!

They are very easy to make and you add your own elements to make them even tastier. If you want to find out how you can make them yourself then just keep reading.

Friday, December 4, 2015

Chocolate & Strawberry Truffles - #24DaysOfBlogmas Day 16

Hey everyone! It's day 16 of #blogmas and we've got a couple of baking posts lined up for you!

We wanted to make some small treats for you and your family. The first ones are chocolate and strawberry truffles which are super easy to make and they taste delicisous! I would definitely say these are more suited towards adults just because they are quite rich in flavour and a bit messy! But I'm sure children would love them just as much.


You can eat these and decorate them in so many different ways. Leave them just as a truffle you will have created a soft treat or cover them in chocolate and freeze for a chocolate surprise. Our other baking post is more for children so make sure you subscribe so you don't miss it!

If you want to find out how you can make your own truffles then just reading!

Thursday, December 3, 2015

Santa Gift Card Holder - #24DaysOfBlogmas Day 15

Hey everyone. Can you believe it's day 15 of #blogmas! 

I recently saw a tutorial on YouTube that really caught my attention and I really wanted to re-create it. I have been subscribed to Susanne over at SuNN Stampin for quite some time and I love the videos she does. She's so pleasant to watch and does easy to follow fun tutorials which I would highly reccomend for craft lovers! Check out her channel here and watch the video that inspired this post here.


It's a very cute and easy to make gift card holder with a belly band that looks like Santa's belt!

If you want to find out how to make this then just keep reading.

Wednesday, December 2, 2015

Gift Box For Men - #24DaysOfBlogmas Day 14

Hey and welcome to day 14 of #blogmas! It feels like it was only yesterday I started this. What has been your favourite so far?

Today I wanted to show you a fun way of boxing up a perfume or any tall items to give to your friends or family for christmas.


I made a box like this a while ago for wine glasses my sister makes but I wanted to show you a more masculine version. This box is super easy to make and you could easily adjust the size to fit your gift!

If you want to find out how to make it then just keep reading.

Tuesday, December 1, 2015

Christmas Tree Card - #24DaysOfBlogmas Day 13

Welcome to day 13 of #blogmas! Can you believe we are officially in December now?! I am so excited for Christmas this year.

I wanted to do a tutorial today showing you how you can make a simple card using minimal stamps.


I love this tree stamp, I believe I got it free in a magazine! This card is super easy to make and there so much room for experimenting. You could change up the colours to get an entirely different look. I think it would be fun to make a whole bunch of these all in different colours.

If you want to find out how you can make this card then just keep reading.

Monday, November 30, 2015

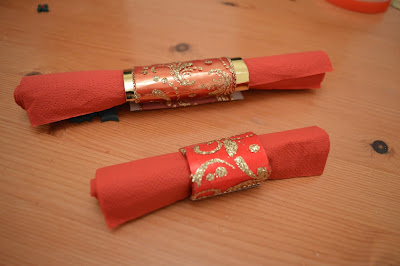
DIY Napkin Rings - #24DaysOfBlogmas Day 12

Hey everyone and welcome to the 12th post of #blogmas. First of all I can't believe we are all ready half way through and second of all, it's December tomorrow!

Today I wanted to give you another tutorial which you can use to decorate your table for that special family christmas dinner. I showed you how to do some placemates a few posts back and today I wanted to show you how you can create your own napkin rings.


These are so easy to make and you can create them for any size napkin you want. I wanted to give mine a simple look but you could add a lot more if you wanted to.

If you want to find out how then just keep reading.

Sunday, November 29, 2015

Hanging Snowflake Decoration - #24DaysOfBlogmas Day 11

Hey and welcome to day 11 of #blogmas!

I wanted to show you a decoration in todays tutorial which can be used in many different ways.


If you've been following all the blogmas posts you will know my theme this year for christmas is gold and red. 

I wanted to create a piece of decoration that was fun, had glitter but still looks very neat and subtle.

I created these suspended snowflakes in circles of ribbon which as you can see in the above picture I put all together and stuck them to a wall. This is just one of the many ways you could use this and I will tell you the rest at the end of this post so be sure to continue reading.

Lets get started!

Saturday, November 28, 2015

Milk Carton Box for Chocolate - #24DaysOfBlogmas Day 10

Hello everyone and welcome to day 10 of #blogmas.

I really hope you've enjoyed all the posts we've done so far, please be sure to let me know if theres anything you want to see.

In todays post I wanted to share you with how you can make a cute little milk carton box for a piece of chocolate.


I purchased a pack of chocolate snowmen and reindeers and thought it would be fun to create something that I can put them in. I gave this one to one of my granddaughters and she loves it! 

These are so easy to make and they are perfect for any little gifts you want to give Christmas day or even before.

If you want to find out how then just keep reading.

Friday, November 27, 2015

Wrapping Paper Decorating - #24DaysOfBlogmas Day 9

Hey and welcome to another #Blogmas post!

I can't believe we are already nearly half way through. 

I wanted to another quick tutorial today showing how you can create your own christmas wrapping paper.


I've always found wrapping presents quite tedious and never found a paper that I absolutely loved. Once I realised I could in a way create my own it has changed my opinion completely.

It's so easy to do and you can make your paper to match your theme. All your presents under your gorgeous decorated tree can all look they a picture from a magazine!

If you want to find out how you can make yours then just keep reading.

Thursday, November 26, 2015

Shaker Gift Tag - #24DaysOfBlogmas Day 8

Hey everyone and welcome to day 8 of #Blogmas! 

I've been having so much fun the last few days working on some more posts for the next 16 days! I can't wait for you see what else I have planned.

Today is almost a little sister to the post from day 4 the Shaker Card which you can find here. I show you how you can create your very own shaker card.


In this post I will show you how you can use the exact same method to create a shaker tag.

They are so easy to make and are very unique. I think these would be perfect to put on childrens toys as it allows for some interaction.

If you want to find out how you can easily create your own then just keep reading.

Wednesday, November 25, 2015

DIY Placemat & Coaster - #24DaysOfBlogmas Day 7

Hey everyone! I can't believe it's already day #7 of Blogmas already. I'm pretty sure doing this will make Christmas come around so much quicker for me!

How have you been enjoying it so far? It's definitely been a lot more fun, and challenging at times, to work so much more fast paced trying to make sure all the pictures are done and we don't fall behind doing this project but it's definitely been worth it so far.

In todays post I wanted to share with you a quick table decoration idea. I will be showing you more throughout the next 17 days so stay tuned!


You can very easily create placemats and coasters for you table to use during your christmas dinner. I really want all my christmas decor to match this year and I've chosen a red and golden theme. I don't want to have to hunt around for little things like placemats as I have such a specific colour theme.

If you want to find out how you can create your own then just keep reading.

Tuesday, November 24, 2015

DIY Advent Calendar Part 2 - #24DaysOfBlogmas Day 6

Hey everyone! Welcome to part 2 of how to can create your own advent calendar!

If you missed part one where I show you how to can make your boxes then check out the post here.

Today I will be showing you how to put it all together. It's pretty simple to do and I think it not only makes a pretty cool advent calendar but also looks like as a decoration piece.


I wanted to create the effect of a christmas tree which is very easily done with 25 boxes.

If you want to find out how to assemble your advent calendar then just keep reading.

Monday, November 23, 2015

Decorate Gift Tag - #24DaysOfBlogmas Day 5

Hey everyone and welcome to day 5 of #blogmas! I feel like the first four posts have just flown by.

How have you been enjoying it all so far? Let us know if there is anything you would like to see.

Today I wanted to show you another way you can create a cute gift tag. This is more decoration a ready made one than actually making it but you could definitely do one from scratch.


I think little touches here and there on my project can make the biggest different. I also think it's nice to create a special label if you have one present that is considering more main than the rest to put it on. Make's it stand out a lot more!

If you want to find out how I decorated my gift tag then just keep reading!

Sunday, November 22, 2015

Christmas Shaker Card - #24DaysOfBlogmas Day #4

Hey! Welcome to yet another #Blogmas post. I have been loving doing there the last few days and can't wait to continue up until post #24.

Let me know how you've been enjoying them lately!

In todays post I want to show you how to make a Christmas shaker card. I showed a shaker card a few posts back and I will be using the same method to make this one. Stay tuned though because I will show you the other method.


I think shaker cards are perfect for christmas as you can use the shaker part to create a snow scene. Again this card is perfect for pretty much all ages and it will make a wonderful piece to someones card collection! 

If you want to find out how to make to this card then just keep reading!

Saturday, November 21, 2015

DIY Advent Calendar Part 1 - #24DaysOfBlogmas Day 3

Hey everyone! Welcome to another day of #Blogmas here on Sukilu Crafts.

Today on day #3 will be part 1 of how to make your own advent calendar. I will also be showing you how to put it together so be sure to stay tuned for that! 


I experimented last year making my ow advent calendar but it didn't turn out exactly how I planned. I love how it turned out this year though and I think my granddaughters are going to love them! 

This is a perfect idea for someone who doesn't like chocolate or if just want to fill it with something other than food. I know that things like Shopkins are extremely popular with children at the moment.

They are pretty easy to make but as you need to create 25 then it does take up quite a few supplies. It's well worth it thought in my opinion.

If you want to find out how to make your own the just keep reading.

Friday, November 20, 2015

Handmade Gift Tags - #24DaysOfBlogmas Day 2

Hey everyone and welcome to day 2 of Blogmas!!

I hope you enjoyed the first post last night where I showed you how you can make your own christmas crackers! If you haven't seen that post yet check it out here.

Today I wanted to show you something very simple yet fun in my opinion.


Handmade gift tags! I wanted to make something slightly different to your typical christmas gift tag. You can add as much decoration - like pictures or sentiments - as you would like and still have more than enough room to write your message.

You can make these whatever shape, size, colour you would like and they take no time at all!

If you want to find out how to make your own gift tags then just keep reading.

Thursday, November 19, 2015

DIY Christmas Cracker - #24DaysOfBlogmas Day 1

Hey everyone! Welcome to an exciting time here on Sukilu Crafts.

Me and Danielle really wanted to do something special for christmas and we come up with the idea to do Blogmas (a take on Vlogmas). In the next 24 days you will get a post from us every single day. They will all be christmas related! There may even be a special giveaway at the end.

To kick of Blogmas I will show you how you can make your own christmas cracker! The beauty of making your own christmas crackers is that you can fill it with whatever goodie you like. Also a lot of christmas crackers make a loud noise when you pull them - not these ones!


You can also customise the colours of your crackers to match your decor! They are pretty easy to make but one tool you need to make it work better is a paper cutter with a perforated blade. This will just create small slits in your card stock to allow it to rip smoothly. You can achieve this in another way which I will explain to you later in the post.

If you want to find out how to make your own christmas cracker then just keep reading.

Sunday, November 15, 2015

DIY Paperclips 2 Techniques!

Hey everyone!

I wanted to do a quick post today about how you can decorate your paper clips. I was totally inspired by some Heidi Swapp paperclips Danielle had!

They are so easy so make and you can decorate them to coordinate with your planner pages, journalling pages or whatever you would like. It's also another fun way to use up some of your scraps.


In this post I will show you how to decorate with ribbon and die cuts! I used some large paperclips I purchased from Tiger, they were super inexpensive.

If you want to find out how to decorate yours then just keep reading.

Wednesday, November 11, 2015

How To Create A Cloud Scene + Some Fun News!

Hey everyone! Welcome to another post on our blog!

Today I wanted to share with you another technique which is fun and I think you will really enjoy it.

I have done a few techniques on my blog before. I love how you can use your crafting supplies for more than they are intended for and there are so many possibilities with what you can do.


The technique I will show you today is how you can achieve a cloudy-like sky. I think it looks pretty realistic and you can use it for many things. Creating a scene on a card, some decoration for journalling or some DIY artwork for around your house.

You will only need a few things for you so just keep reading!

Sunday, November 8, 2015

Birthday Shaker Card - Step By Step Tutorial

Hi everyone! Hope you have had a lovely weekend.

I feel like I haven't done many card tutorials lately so I thought it would show you how you can make a shaker card. I love these cards as I think they are so fun and perfect for a wide range of people and occasions.


I've seen people make shaker cards using a few different methods so in this post I would show you one of them. If you would like another post making one using a different method then please let me know.

If you want to find out how you can make one of your own then just keep reading.

Saturday, November 7, 2015

DIY Midori Pocket Insert - Fridays With Danielle

Hi everybody!

I'm so sorry for this post being a day late but I didn't have the camera with me unfortunately!

I wanted to do a quick and simple post for you today showing how you can make a Midori Pocket Insert for your Fauxdori's, Foxydori's or even one you have made yourself.

If you read my post you will know I love the whole travellers notebook world and making my own inserts and accessories is something I really enjoy doing.


I showed a picture of one I made in my DIY paperdori post, you can find it here. I wanted to show you exactly how I made it in tonights post.

If you want to find out how to make one of your own then click the button below.

Wednesday, November 4, 2015

Pattern 3D Butterfly Picture - DIY Decor

Hey everyone!

Welcome to another post.

I wanted to do another quick one tonight to show you a cool way you can DIY some decor for your home. I purchased this deep frame from my local charity shop and I wanted to find a fun way to use it.

I decided to create this pattern of 3D butterflies on a sky background and I loved how it turned out. I really wanted to share it on here incase it gave someone else inspiration to create some wall art of their own.


It's so easy to do so just keep reading to find out!

Sunday, November 1, 2015

DIY Lantern - Step by Step Tutorial

Hey everyone!

Welcome to another step by step tutorial.

In todays post I wanted to show you an amazing way you can create a safe decorative lantern. I have done another post previously showing you a milk carton lantern - see post here. 


I decided to make a bigger slightly different version which again like the previous is safe. There are a lot of steps to this tutorial but once you get the hang of it, its super easy!

Apart from decor this would also look so sweet in a child's room! You could make them as tall or as short as you would like. 

Now let's get on with the tutorial, keep reading to find out more!

Friday, October 30, 2015

Halloween Planner Spread & Hey Little Magpie must haves! - Fridays with Danielle

Hi everyone!!

Todays post will just be a quick one but there are a few things I wanted to share with you.

I haven't really shown my planner much on here but I was so happy with how my Halloween spread turned out I just to.


Wednesday, October 28, 2015

Pillow Box Tutorial!

Hey everyone!

Hope you have all been enjoying your week. My daughter was down for a few days from University so we have all been making the most of seeing her. 

In todays post I wanted to share with you a quick tutorial on how you can make a pillow box. You know how much I love making boxes! But the one thing I love about this box is there is almost a formula to making these which allows you to make any size you would like.


In this post I will show you two different sizes and at the end I will explain to how you much you make any size you would like!

Keep reading to find out!

Sunday, October 25, 2015

DSP Stripe Window Card - Step By Step Tutorial

Hey everyone!

Welcome to another step by step tutorial. In todays post I wanted to show a method to create a card for any occasion! I have a lot of things in my crafting stash that I feel I don't use because it's not what I would normally go for but I know finally found away to use things up!

Basically this card has a window, or two, and you use strips of ribbon, DSP or washi tape to create a pattern of stripes inside the window.


It's definitely the perfect method for a christmas card! Not to mention it's a very beginner friendly card.

You could make this card for anyone or any occasion. Also if you are anything like me and you hold on to each and every scrap you have, you will be able to use some of them for your strips.

If you want to find out how to make this card then just keep reading.


Friday, October 23, 2015

Make Your Own Erin Condren Planner Cover - Fridays With Danielle

Hi everyone!

So I've been into planning for quite some time now and I really envy you planner girls who have ring bound planner such as the Kikki K or Filofax! I love how much you can customise you planners with different dashboards, inserts, dividers and the large pocket space you have to fill with planer goodies.

I've had my Erin Condren for a while now and I decided to try and customise it in whatever ways I can. I have seen people making their own covers for it so I decided to give it a go.


I love how it turned out and I feel its much more my style! It was so easy to do but I will say the one thing I learnt was you need to have decent quality laminating pouches. Although it did still work out for me using low quality pouches (they came free with the laminator) it's not extremely sturdy!

If you want to find out how you can make your own cover then just keep reading.

Wednesday, October 21, 2015

Make Your Own Bookmarks - #SukiluDIY

Hey everyone!

So you may have heard my mention a few times that my youngest daughter is currently away at University at the moment. We are all still missing her ridiculous amounts! Since she has been away every now and again I like to send her little present, a lot of them are practical but some are just for fun.

Being away at uni requires her to do a lot of studying which usually involves reading a lot of books. Because she loves reading in general anyway I thought it would be nice to send her some little handmade bookmarks. 


I thought it would be fun to show you how I made her bookmarks because not only are they super easy to make but they make for fun little gifts for your friends and family.

If you want to find out how to make your own then just keep reading.

Sunday, October 18, 2015

Washi Tape Holder - Step by Step Tutorial

Hey everyone!

I’ve got another step by step tutorial today for you. I saw Sam from Pootles Papercraft make these washi tape holders and I immediately wanted to make a few for myself. I have accumulated quite a few washi tapes these last couple of month and my organisation for them makes it difficult for me to use them all.


This holder is perfect for sorting out large amount of washi in a way that’s practical in terms of space but also allows you to see them all. You should definitely check out Sam’s youtube channel. I abolsutely love watching her videos, she has so many great tutorials and is all round a pleasure to watch! You can find her youtube channel here.

If you want to find out how you can make your own then just keep reading!

Friday, October 16, 2015

How To Make Your Own Paperdori - Fridays With Danielle

Hi everyone!

If you've been reading my posts since I started doing posts on her you may know I have been very interested in the Midori world. I have seen to many videos on youtube and pictures on Instagram of people using midoris and travellers notebook in such creative ways.

I have a couple of Foxydori's - shop here -  on my christmas wish list but I really wanted to try and make my own. I had a browse online of anywhere I could get my hands on some faux leather or PVC material but being an impatient person I decided to give a go with paper. 


If you aren't familiar with Midori's check out this awesome video by the Reset Girl here. She goes in-depth about sizes, where you can purchase them from and the accessories you get for them.

It was actually a lot easier than I thought to make and I also liked the fact I could add a bit colour to it by using patterned paper. 

If you want to find out how to make your own paperdori then just keep reading.

Wednesday, October 14, 2015

DVD Gift Box! - Step by Step Tutorial

Hey everyone!

Hope your week has been going very well. Definitely starting to tell summer is over now here in the UK. I love autumnal fashion though so it's all good!

In todays post I wanted to share with you a gift box I made that is perfect for a DVD or small book! I measured a DVD and came up with the dimensions for a box myself. I know I usually post my tutorials on Sundays but I thought I'd share this quick one with you tonight.

I got some free stamps in a magazine I love to buy - Cardmaking & Papercraft and I was totally inspired by the free christmas stamps you get with it. I have used some of the stamps before in a post from this magazine too. I know it's still a while yet before christmas but I never think it's too early to start prepping early!

Follow Cardmaking & Papercraft on twitter here.


And for you crafters out there, it's the perfect size for a Stampin' Up set of stamps that come in the DVD boxes (the slim ones). The perfect present for a fellow crafter!

If you want to find out how to make this then just keep reading.

Sunday, October 11, 2015

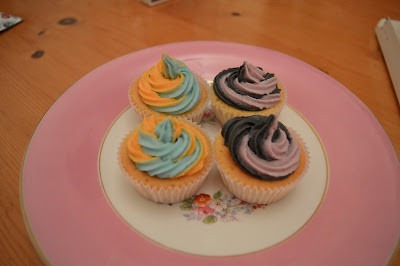
Two Tone Icing! - Piping Method

Hi everyone! We are so sorry for the lack of posts this week! If you follow us on twitter you may know that Danielle and myself have been unwell this week and had to take a short break from the blog. We are so glad to be back and I wanted to share you with a quick piping method I have been using lately.

I have been making cakes like crazy for the last month or so and I wanted to try different decorating techniques. I have got fairly confident in piping on icing so I thought it would be fun to try something new.

I recently made some cakes and managed to achieve this two tone icing look with a very simply method. It was a lot easier than I thought it would be and I think they look so cute!


You could try even more colour combinations or even add a third colour once you got the hang of it. 

Check out my cupcake post here to find out how to make the cakes and the icing!

If you want to find out how you can achieve this effect then just keep reading!

Sunday, October 4, 2015

Flat Fold Box - Step By Step Tutorial

Hey everyone!

Today I wanted to show a quick tutorial on how you can make this adorable box!


It's so simple to make and one of the very cool features about this box is the fact it folds flat. This would be an ideal little gift to send someone as you wouldn't have to worry about bulky post! You could make up a load of these and not have to worry about them taking up a lot of space!

It's also perfect to hold some small cards. You could create a set with the same colour scheme but different occasions. As you know I love making boxes and the more you know how to make, the more you can accommodate for.

If you want to find out how to make it then just keep reading.

Friday, October 2, 2015

£1 October Listers Gotta List Set Up! - Fridays With Danielle

Hi everyone! I am so excited to share tonights post with you because I feel this will help so many people.

If you follow a lot of planner girls on instragram you may have noticed a few doing the #ListersGottaList challenge hosted by The Reset Girl. It's an amazing challenge! You basically get a prompt for each day of the month and you create the list based on the prompt. There is room for adapting the prompts to suit you better if needed. There is also some for younger people. If you want to find out more information about this head on over to http://listersgottalist.com. It's completely free to take part.

I have seen this challenge for months and have always wanted to participate but struggled. I found it so difficult to find the method to record my lists and also the time to do each list. I knew I wanted to do a fair amount of decorating but also making sure I don't overwhelm myself. Looking at all the other lists people had created I was so inspired to find the right method for me to take part in the challenge and I now feel so confident about it!

Wednesday, September 30, 2015

Quick Way To Spruce Up Your Lampshade! - Decor DIY

Hey everyone! I wanted to do a real quick post tonight to show you an easy way to glam up your lamp shade.

I had bought a plain white lamp shade from Ikea and it was so dull I never ended up using it. I was sorting out some of my crafting supplies when I came across these strips of beads/gems and hearts and thought they would be perfect to try make my lamp shade look a little more fun!


It's such an easy DIY to do and all you need are some plastic gems or shapes and a hot glue gun!

If you want to find out how to achieve this then just keep reading.

Sunday, September 27, 2015

No Bake Vanilla Cheesecake! - Step by Step Tutorial

Hey everyone and welcome to another post. Can you believe the weekend is over already?!

I wanted to give you a bit of a break from my usual tutorials and show you something I love to cook up in the kitchen.

I love making cakes but one of my favourite kinds of cakes is cheesecake. I have made this vanilla no bake cheesecake for years and it is definitely a family favourite! It's such a simple desert but it's so tasty. I can also add little touches here and there to make it unique for any individual. 


What's amazing about this cake is that the only 'baking' required is to melt butter. These are the perfect treat for littles ones and they won't be waiting around for the cakes to cool down!

If you want to find out how you can make your own no bake vanilla cheesecake then just keep reading.

Friday, September 25, 2015

The Importance of a Brain Dump! - Fridays With Danielle

Hello everyone! Welcome back to another post with myself, Danielle. I can't believe it's Friday already!

I wanted to do a post explaining what I feel is the importance of a brain dump. I have been using it now for around a month and I can honestly say it has helped me out so much! A brain dump is essentially a place where you store any ideas, things you want to remember, basically anything that comes to your mind and you want to be able to record it.

The thing I love about a brain dump is that it can be as messy as you want it to be. You can slap on a load of sticky notes or just write directly on the page. It doesn't have to be this beautiful decorated or organised place. As long as you can decipher it all, its fine! I did decorate the front of mine though. How can I not?!


Wednesday, September 23, 2015

Faux Embossing With Dies!

Hey everyone!

I wanted to do a short post today showing you a technique I have recently discovered. Bit of a break from tutorials!

One thing I love to do with all my projects is embossing card with embossing folders through my big shot. Whilst this technique is so much fun something I find myself limited to the kind of patterns I have and I don't have much control in terms of where I emboss. 

I discovered a way you can create the look of embossed card using dies. 


Wouldn't this just be an amazing christmas card?! Pop on a sentiment and a splash of colour and thats it!

With this technique you have 100% control over the outcome and the possibilities will be so much more than with just regular embossing folders.

If you want to learn this technique then just keep reading!

Sunday, September 20, 2015

Milk Carton Box With Windows - Step By Step Tutorial

Hey everyone!

Welcome to another Sunday step by step tutorial. I have been so looking forwards to getting back into my crafting since I've been back off holiday. You may also know my youngest daughter went to University yesterday so I have also been busy getting her ready for that!

In today's tutorial I wanted to show you another milk carton type box. I showed you how to make a smaller one a while ago, you can check it out here, but I love experimenting with different sizes and I thought I would show you a bigger version.

I made something very similar to these last easter and filled them with lots of chocolatey goodies for my family. 


I love the little windows on the box so it gives a little sneak peak to whats inside. As always with any box or bag the possibilities for occasions or who you give them to are endless! I think it greats to have a wide range on hand made boxes you can make because them you aren't limited to whats gift you can buy. I never think you should base you gift on what boxes you make but the other way round!

Long go the days for me buying huge gift bags from the supermarkets and only putting a box of chocolates inside!

If you want to find out how to make this box then just keep reading

Friday, September 18, 2015

Stitched TN Insert & What We Won! - Fridays with Danielle

Hey everyone!

I recently was asked by my aunt to make her a travellers notebook insert because she had seen a few other I had done. I was more than happy to do that for her and I wanted to show you my new method of making them. If you want to see one I made for my niece then check out this post here.

I have discovered an easy method of binding the book I make which obviously keeps the paper from the falling out. It also gives me a lot more room to decorate exactly how I want! If you've been reading my post for a while you will know how much of a fan I am of Cori @ The Reset Girl. I've seen multiple videos of her where she decorates inserts and it's definitely one of my favourite things to do now!


Also you may not one but we won a giveaway on Instagram! Stay to the end of the post if you want a little look at what won.

Here how I make my inserts now.

Wednesday, September 16, 2015

Gift Bag In A Rush!

Hi everyone!

I wanted to do a short and sweet post today to show you a quick gift bag idea if you are in a rush!

There have been a few times in the past where I bought a present for a loved one and completely forgot to buy wrapping paper. I don't tend to have gift bags lying around my house so I wanted to see if I could quickly grab some of my crafting supplies and make up a gift bag in little to no time!

I still love to show people that I make some short of effort and they can still appreciate the personal touch I have added to their gift. Now obviously you can decorate or embelish this gift bag as much as you would like but I thought it would be nice to show you that even with the smallest decoration it can still look cute.


It would be so easy to make this bag for any occasion for any person you intended it to be for!

Here's how you do it!

Sunday, September 13, 2015

Wine Glass Box - Step By Step Tutorial

Well hello everyone! As you will know I have been away on holiday for the last couple of weeks but I am finally back! I'm so exciting to be back and get back into my crafting room!

I already had this post pre-planned for today and I'm pretty excited for this one. My sister makes glitter glass, you can find her instagram account here, and she asked me if I could make a box for a friend of hers as she was gifting them one of her glasses. Tell her I sent you!


I love the box I think it's so beautiful and it would be perfect a number of gifts.


For size reference it's perfect for a 340ml wine glass. Her glasses look so cute in these boxes and I can't wait to make some more for her! They would even be ideal if you were gifting someone a mini bottle of wine. That would be amazing!

There are quite a few steps to making this box and some of the measurements aren't the usual measurements I would like to work with but I found that it makes the lid fit perfectly! If you have any questions please be sure to let me know!

If you want to find out how to make this box then just keep reading.

Friday, September 11, 2015

All About Inspiration and Motivation! - Fridays With Danielle

Hello everyone!!

I wanted to do a slightly chatty post this evening as in the last few weeks I have felt this sudden inspiration and motivation to be really creative and productive with my crafting. When I first discovered the planning and scrapbooking world I have to admit I was slightly overwhelmed. I really wanted to be a part of it so I just dipped my toe in by getting my first planner.

Since getting my Erin Condren Life Planner I discovered a complete world filled with a huge amount of different planners, scrapbooking elements, journalling and so many more things. I was so in love with each and everything I saw but I didn't feel I could find my own style. There are so many amazing planner girls out there on youtube, Instagram and other platforms I just felt I didn't even know where to begin.